Showing posts with label Eclipse. Show all posts

Tuesday, September 2, 2014

Compiling GEOtop with Eclipse (on Mac)

[The three  operations below are in common with the compilation of GEOtop by using a makefile, and they are better described here in a previous post]

1- Follow the instructions to install meteoIO. Install and compile it. 

This create the dynamic libraries to be linked to GEOtop. Saving the libraries in a “standard place” could be useful. The other information to annotate is the position of the meteo include files (/usr/local/include, at least under Mac OS) since Eclipse needs them to compile the code.

2 - Install the boost libraries

3 - Download GEOtop from the Git:

[The above operations are in common with the compilation of GEOtop by using a makefile, here]

4 - Set up the Eclipse project^1 

Select:

File -> New -> C++ Project 


Then follow instructions from the pop-up window. If you never did it before, you better think, to browse Eclipse on-line help. 

Next you have to indicate the path of the meteoio libraries and includes. These are not the only one includes that are supposed to be made visibile, as you will learn below. 

Right click on the project. From the menu, select ‘Properties’. A pop-up window will appear. Select and open (clicking on the triangle) the C/C++ General Menu. Go and select ‘Path and Symbols’. On the right side of the pop-up window will appear. The window presents several button. The ones important for us are the ‘Include’ button and the ‘Libraries *’ buttons. 
If you click on ‘Includes’, a selection of languages will be shown. Select GNU C++ (that’s my case). Click on the ‘Add’ button at the right side of the window for adding libraries. A further pop-up menu will appear.

Select the ‘File System’ button. This will drive you to the selection of the directory you need.
Repeat the operation all the times it is required. 

Subsequently, always in the same pop-up menu, click on ‘Libraries’. Click on ‘Add’ and add the names of the libraries required: meteoio, meteoio.2.4.3, meteoio.2. These names correspond to the files called lib*.dylib where the ‘*’ stands for the name of the library required. Repeat the operation for each one of the libraries name. [I do not think it is necessary to link all the three libraries, since the real library is one. The others are symbolic links. However, I did not experimented differently]. 

Third, go back on the Path and Symbols window, and select ‘Libraries Paths’. With the same type of procedures as before, please add the path to the libraries. 

Then, you have to import manually the file into Eclipse. GEOtop “core” related files are contained in the root folder of the project, i.e. only the file ‘config.h’, and in the directory: ‘geotop’, ‘gt_utilities’, ‘libraries’, ‘meteoio_plugin’. Directory (folder) ‘libraries’ has two subdirectories (subfolders): ‘ascii’ and ‘fluidturtle’.  Therefore, these directories needed to be created inside the just created GEOtop folder:

File -> New -> Folder, as it appears in the Figure below
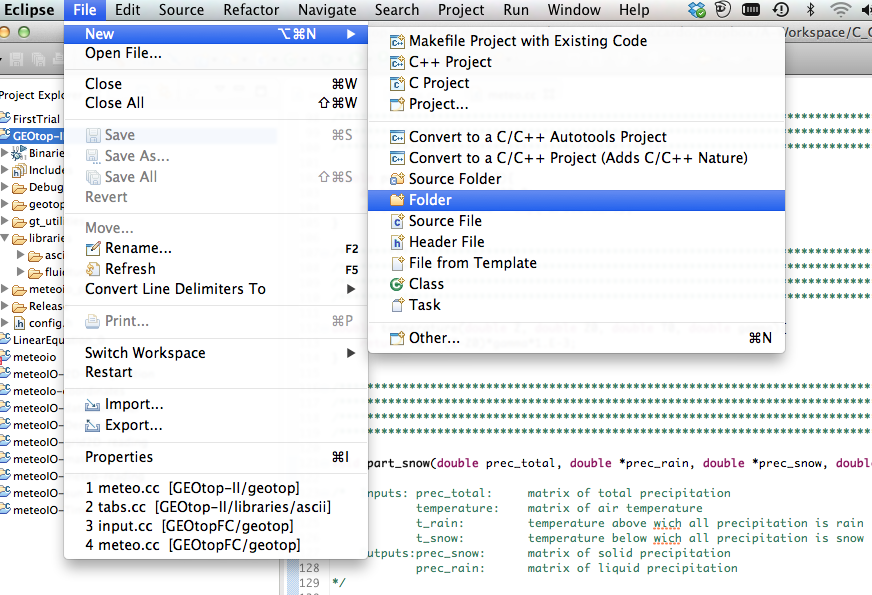

Now, what you have to do is to populate the folders with the files:

Right click on the folder in the Project Explorer -> Select Import, and the following window will appear:

Select ‘File System’, and then ‘Next’. Then follow the instructions. Clicking on the ‘Browse’ button a pop-up window will guide you. 

Another operation to consider is that some include files in the code were declared with < > instead than  “ “. This implies that these includes are recognised as “system include” or of this type. Therefore the path to these include has to be added to the project. This addition works the same way as in point #4. The files of which we are talking about  are 'inputKeywords.h' and  'config.h' that has to be added since it has been place directly in the root directory. [ I am not sure that this is necessary but, at the moment, I could not find a better solution. ]

Now you should be almost done. Just


5 - Build and Compile.  [To do it, get the instructions here. When I did it, I got a conflict in linking which was solved by observing that there were some duplicate classes. I just cancelled:part_snow.cc and part_snow.h from the project]

_________________________________________________________________________________
^1 - One would probably get the project directly inside Eclipse using Egit. This is not an option at moment. But I am thinking to create a clone of the git from where it will be possible. In meanwhile, you can get the project from here. 


Thursday, August 21, 2014

Compiling meteoIO Examples with Eclipse (under Mac OS 10.4.9)

This is an ongoing task in the direction to compile GEOtop 2.0 under Eclipse and subsequently to embed part of it in OMS v3. 

Since to work with GEOtop 2.0 one needs to be aware of what meteoIO does, I started from it. 

To keep it simple, I first compiled the meteoIO libraries as described in the related post, by command line (compiling meteoIo under Eclipse will be a further task to explore eventually). Then I open Eclipse. For the occasion I did a new installation of the recent Luna IDE, installing the default CDT for managing C/C++ projects. 

I created a new project for one of the examples (by command line and following the instructions given in meteoIO website you can compile all the examples at once. However, if you get in problems to execute them, you do not know what to do, and you need to go to explore the examples content. Then you need a IDE or, at least a text editor, to browse the files ….). 

Then you have to add the example file you need. Assume, for instance, the file called time.cpp.
Import it in Eclipse by using  

  • ->File
  • ->Import
  • ->File System
  • -> Next Button 
  • -> Browsing directories 
  • -> Selecting the desired file by checking the box 
  • -> Finish


Before compiling successfully you have to tell the compiler two things: where the include files of the meteoIO files are (which contain the definition of all the meteoIO methods), and where the meteoIO libraries are. The first is required for compile time, the second for linking time. 

In particular the libraries of meteoIo are meteoio, meteoio.2, and meteoio.2.4.3 (please note that each of them, under Mac OS X is written as lib*.dylib, where * stands for any of the three names above). I actually placed them in one of my working directory but a standard choice would be probably better.

The includes files were instead placed under /usr/local/include (they were actually under  /usr/local/include/meteoio but the last directory is specified inside the code)

So here they are the instructions for making the libraries visible to the linker:
  • -> right click on the project
  • -> find “Properties” on the menu and click it
  • -> choose “C/C++ General”
  • -> choose “Path and symbols”
  • -> select Libraries
  • -> click on Add
  • -> specify the name of the libraries (without lib and .dylib)  
  • -> select Libraries Path
  • -> click on "Add"
  • -> specify the path were the linker can locate the libraries
  • -> Finish


Here you find instead the instructions to for making visible the include files:
  • -> Right click on the project
  • -> Select Properties
  • -> Expand the options
  • -> choose “C/C++ General”
  • -> choose “Path and symbols”
  • -> Browse the filesystem to find the /usr/local/include directory [details as above]
  • -> Finish


Then you are ready to build your project and execute it. ^1^2^3

______________________________________________________________________________

^1 - Please be aware that when you change building option, e.g. from "Debug" to "Release" option of Building (the hammer Icon in Eclipse) you have to said again where the library are to the linker. Actually there is a checkbox that you can  select for importing the the configuration in both the Debug and Release modes.

^2 The executables can be found under the Workspace Folder/Project Folder/Release, where "WorkSpace Folder" is the directory declared at the starting of Eclipse, "Project Folder" is the name of the current project.

^3 Many MeteoIO example require something in input and do not fail gracefully when this input is not provided (they give the error code "segmentation fault 11).

Monday, March 17, 2014

Setting up Eclipse for working with Object Modelling System v3

At the last school on  Object Modelling System, dr.  Gabriella (Gaby) Turek found a setup for running OMS inside Eclipse IDE (OMS developers use Netbeans). Recently Gaby improved the configuration she found in Trento. Here tehy are, her suggestions :

" So here’s what I came up lately that is IMHO “clean”
  1. Open Eclipse
  2. New > Project > General > Project
  3. After project is created, copy all the directories and files from the project you want to work on (or project skeleton directory for a new project) into the newly created project. You can do this thru Eclipse or thru the command line. If you do the latter, make sure that in Eclipse you right click on the Project name and select Refresh so that Eclipse “sees” all the new files. You can omit the netbeans folder but make sure you don’t forget the .oms one
  4. Right click on the project name again and select Properties > Builders > New > Ant builder
  5. Give it a name, browse to select the project build.xml file, and browse to select base directory (the project’s directory). Save by selecting OK.
  6. Now if you right click on the build.xml file and choose the Run As > Ant build, the “all” target will be inked to compile. Note that in the Mac, if you are also compiling fortran code as part of the build (or C, or…) you will get an error like “cannot run program gfortran file not found”. This is because Eclipse started from the UI interface does not pick up any path settings you may have. This can be overcome by starting Eclipse from the command line using the command > open -n ./EclipseJ2SE.app
  7. To run a specific sim file. Right click on Run AS > Ant Build … . Name the the configuration. Select the targets you want to run (for example all and run, or just run)  Click on the Main tab and in the arguments section enter the sim file you want to run as in this  example:  –Dfile=simulation/Example1.sim. Click on Common tab and click on Display in favorites menu.  Create one for each simulation file
  8. So that’s how to set up and run and existing project.

I should explore what advantage comes with in step 2) selecting Java Project and proceeding the same way. You get the eclipse java builder….. not sure at this point if it buys you anything. As I mentioned I have not figured out how to set up debugging. But then I couldn’t make work too well in Netbeans either. Perhaps it requires a complete paradigm shift away from netbeans in terms of project setup. "

Wednesday, August 8, 2012

GEOtop Fishing Days

With the aim to help people to run GEOtop and understand a little more its code, and having a preview of what its port to C++ means, I and Mountain-eering organized a three days workshop with a few people interested. This is possible a seed for workshops for a larger audience.
The speaker was Matteo Dall'Amico, a former Ph.D. student of mine, and at present one of the owners of Mountain-eering.
The workshop  provided to participants the key information necessary to disentangle the complexity of GEOtop's use from the scratch: from its installation on the different platforms (Linux, Windows, Mac), including its compilation with the gnu compiler,  understanding its discretization scheme and the input data,  running some template example, working with SVN.  There was also some little theory, especially about snow (but you can refer also to an older post for the theory and some is also contained in the GEOtop History- Part I and Part II).
The slides of the three days can be found here.  However, they do not contain the full information, and should be used as an index of the thing to look for becoming really GEOtop proficient.